Use the Creative Cloud app to install and update apps. If you haven’t installed any Adobe apps yet, see Downloading the Creative Cloud installer first. Or start by Subscribing to Adobe Creative Cloud (below). See a description of each app.
- Quit any Adobe apps that may be running.
- Click the Creative Cloud icon in your top menu bar. Don’t see it? Click the Launchpad (rocket icon) to locate, or click the Finder icon, click the Go menu at the top of the screen and choose Applications, then open Adobe Creative Cloud. Still can’t find it? See the next section.
- Sign in with your Adobe ID and password, if requested.
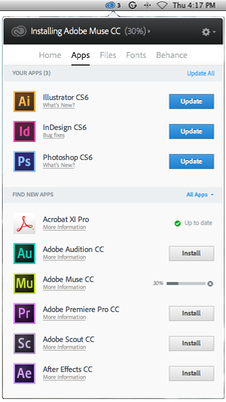
- Click Apps and find one to update or install.
- Click Install or Update across from it. Or click the gear icon and Uninstall if you no longer need the app.
- Repeat for any other apps.
- If possible, avoid opening any Adobe apps until all apps have been installed or updated.
- You’ll find new apps in the Launchpad and Applications folder.
- Drag frequently used apps (not folders) to the dock.
Downloading the Creative Cloud Installer
If you haven’t run any Adobe Creative Cloud apps on this computer, you'll need to load the Creative Cloud Installer first.
- Open a web browser and go to the Adobe Download Center. You may need to sign in with your Adobe ID and password.
- Find the Creative Cloud app and click Download under it. Click the large blue Download button on the next screen.
- Click the Downloads icon.
- Double-click CreativeCloudInstaller.dmg.
- Double-click Creative Cloud Installer icon.
- Follow the steps on the screen to install. Then continue with the next section.
