There’s never been a more exciting time to use a Mac.
If you’re one of the millions of iPhone and iPad users, your Mac’s core apps (such as Safari, Mail, Contacts, Calendar, Messages, Reminders & Notes) will look familiar to you. If you’re coming from Windows, check out Apple’s tutorial for Windows users.
Whether this is your first Mac or you’ve been using them for years, you’re sure to find some great tips right here. Click the links in this article for details. And check out Mac 101 for more tips.
Starting up & shutting down
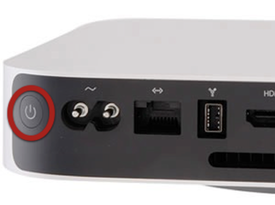
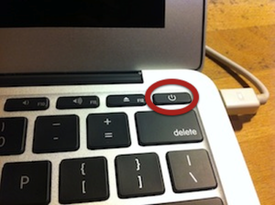
Turn on your Mac by pushing the power button. On laptops look in the upper right corner. On desktop Macs it’s on the back of the computer.
Don’t shut down - just sleep. If you leave the computer for a few minutes, a screen saver appears. After a longer period of inactivity the display turns off and eventually the computer goes to sleep. You can put your Mac to sleep anytime by holding the power button for a couple seconds or closing a laptop’s display. Sleep is the normal idle state for Apple products and uses an insignificant amount of power (usually less than 1 watt). There’s no need to shut down a Mac if you’ll use it again in a few days. Waking from sleep is easy – just push a key on the keyboard, open the laptop display or push the power button. If you must shut down the computer, click the Apple menu and choose Shut Down. You only need to restart the computer every few weeks, or if you’re experiencing strange behavior on your Mac.

Logging into your account
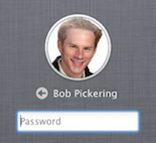
For security purposes, you need to log into an account when you turn on the computer. Select or type your name and password on the login screen, then press return to see your desktop. Don’t forget your password or you’ll be locked out! If more than one person uses a Mac, each should have their own account with separate documents, desktop, bookmarks, email, music and photos. If you need to switch users after startup, just click the Apple logo in the upper left corner, choose Log Out, and then log in as the appropriate user. Need to add a user? See instructions.
Trackpad & mouse gestures
Thirty years ago, Apple brought the mouse the masses. Now, the multitouch interface you’ve probably experienced on an iPhone or iPad has come to your computer. Although you can still use a mouse with a Mac, modern Mac software is optimized for a trackpad. Apple is leaving the mouse behind. And you can, too – with a little practice. Learn about trackpad and mouse gestures.
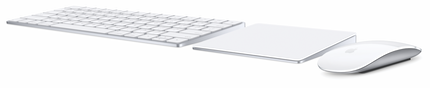
Where are the scroll bars? You don’t need them! Just place the arrow over the part of the window you want to scroll. If you’re using a trackpad, swipe the surface of the pad with two fingers to move the contents up or down. If you're using a mouse, swipe the top surface of the mouse with one finger. The contents move in the same direction as your finger. It’s easy!
Most Windows keyboard commands (such as Ctrl–S for Save and Ctrl–P for Print) are the same on the Mac. Just hold down the Command key instead of Control. Click to see a Windows to Mac cheat sheet.
Opening apps
Common application programs are found in the dock icon bar, normally found at the bottom of the screen. Point to an app to see its name; click once to open and show its windows. Customize the dock by dragging icons from one position to another. The first icon is the Finder desktop where you’ll move or copy files.
The Launchpad (rocket icon) shows all the apps on your Mac. Add icons to the dock by clicking Launchpad and dragging an icon to the dock. To remove icons you don’t use frequently, drag them off the dock. This doesn’t erase the app – it remains in Launchpad.
Who needs discs?
No current Apple products include a disc drive. But don’t worry – you probably don’t need a DVD drive. Discs are an old physical relic from the pre-internet age. The reason the Macs are so light, thin and durable is because there’s no optical drive. It’s also why the batteries in Apple’s portable devices last over 10 hours. Apple offers over 35 million songs, 50 thousand movies, 20 thousand Mac apps and 1.5 million iPhone apps (over 100 billion downloaded)… and none of them need a disc. There are better ways to share files with others than burning a disc.
Working with menus and windows
On a Mac there’s a menu bar at the very top of the screen. The menus change depending on the app you’re using. The first menu (after the Apple logo) tells you the active app.
Window controls are equally simple. Click the red button in the upper-left corner of a window to close it. Click the yellow button to minimize it to the dock – then click the minimized window icon to bring it back up. Click the green zoom buttontake the app full-screen.
Full screen apps are a big help on small displays. When you click the green button at the top of a window, the menus, dock & desktop are hidden. Now you can focus on the task at hand. Swipe left or right with three fingers (trackpad) or two fingers (mouse) to switch between full-screen apps. Move the pointer to the top of the screen to see the menu bar. To make the menus stay on the screen, click the green button again to exit full-screen mode.
Get a birds-eye view of all the open windows and apps on your Mac with Mission Control. Press F3 on your keyboard, then click the window you need.
Dictation & speech

The Mac includes natural-sounding voices to read your text. And you can speak and your Mac will do the typing for you… in every app. Just press the function (fn) key twice. It’s built right in. Learn more about dictation.
Customizing preferences

Change general computer settings in System Preferences. Go here to add internet services – email accounts, Facebook, Twitter & more. Entering the accounts here adds features to all your apps at once. Learn more about internet services.
Apps also have their own Preferences – you’ll find them in the menu named after the application. For example, Mail's preferences are in the Mail menu when Mail is the active app. Learn more about customizing preferences.

A big part of the Apple experience is synchronization. Add a phone number or appointment on your Mac – it’s updated on your iPhone in seconds. Snap a picture with an iPhone and it’s added to your iPad and Mac Photos app. Buy an iTunes movie on the Mac and start playing it on your iPad. Start a document on a Mac and finish it on another Mac or iPad. When your iPhone rings, you can even answer on your Mac. How does this magic work? iCloud. Learn how to set up iCloud.
Saving and finding documents
Save your documents on the desktop or to the Documents folder. You’ll find Documents in the dock or in the sidebar of the window when you save a document. The Documents folder shows as a stack in the dock – click it to go directly to the contents. Save to iCloud in supported apps and you’ll have easy access from all your Apple devices.
Locate most anything on your Mac by clicking Spotlight – the magnifying glass icon in the upper-right corner of the screen. Simply type what you’re looking for – a document name, contact, appointment or email message. You can even look up information on the web, Wikipedia and more. Results are grouped by category – just click on an item and it opens, or Show All in Finder to see a file.
Essential Apple Apps
Your Mac comes with updated versions of important software you’ll want use every day. The Safari web browser takes advantage of the latest web and Mac technology. Mail works with nearly every email system, including iCloud, Gmail, Comcast, Exchange and countless others. Contacts stores everything about the people important in your life. Calendar helps you track your appointments and invite others to events. Reminders creates multiple task lists and alerts you at a specified time or place based on your location. Notes is a great place to jot down a few quick words. These apps sync with other Macs, iPhone and iPad through Apple’s iCloud service. Messages and FaceTime help you communicate with other Apple users and instant messenger services.
iTunes is the best place to organize all your music, TV shows and movies, and explore millions of others. Photos stores thousands of photos and taps into GPS and face-recognition to automatically organize by place and people. iMovie stores and edits video clips – add titles, transitions, sound & video effects and share them on the web. GarageBand has dozens of sampled instruments and multi-track recording so you can create music or audio presentations. Learn more about these standard apps.
Business software
Your Mac might have Microsoft Office for Mac. This is very similar to Microsoft Office for Windows, and reads/writes the same Word, Excel, and PowerPoint documents. Because Office for Mac and Office for windows share the same file formats, there’s no conversion (when Windows colleagues are using Office 2007 or later). And it’s a good idea to build your documents with the familiar Microsoft Office fonts that are common to both platforms. Click if you need to buy Office.
We recommend Apple’s business apps instead. Pages is Apple’s word processor – easier and more “Mac-like” than Word. Numbers is the spreadsheet app, with multiple resizable tables on a page and beautiful 2D & 3D charts. Keynote is arguably the best presentation app on any platform. Keynote creates stunning presentations with stylish transitions and powerful editing and slide-building tools. All three integrate with the Photos app, iMovie & iTunes and fully support full-screen mode, the Retina Display and other Apple innovations. And iCloud support means you can start a doc on your Mac and finish it on matching iPad & iPhone apps a moment later – no manual file transfer required. Of course, these apps import and export Microsoft Office files but sometimes things shift a bit during conversion.
Other useful apps for your Mac – click links for details
- Preview app to open and edit PDFs and graphics files
- Business apps for working with word processing, spreadsheets & finances
- Creative apps for graphics, web & video
- Adobe Creative Cloud for professional designers
- Essential free plugins & utilities including Dropbox & alternate browsers
Buying apps

Most Mac software is sold in the Mac App Store – a blue icon in the dock or Launchpad. It works just like the App Store on iPhone and iPad. Browse over 20,000 apps, most under $20. See screen shots and read reviews. Buy a new app with just a click. Your purchases are charged to your Apple ID – the same one you use for iTunes and iOS apps. Installation is completely automatic and the App Store helps you install the same apps on any other Macs you use at no extra charge.
You’ll need an Apple ID to buy from one of Apple's online stores. If you have an iTunes account or iCloud, you have an Apple ID. We recommend using Family Sharing, or the same Apple ID for all purchases on all Macs, iPhones & iPads belonging to a household or small group. Do not share Apple IDs for iCloud or any other purpose.
Other resources
- Macintosh 101 – lessons in the basics, productivity, business & creative apps
- Macintosh reference guide – advanced techniques for installation, security & troubleshooting
- Apple Mac Basics – Apple’s tutorial site
- Mac apps support – official guides to Apple productivity and creative apps
- Mac video tutorials – short Apple training to help you get started
- Macworld Switch to Mac Superguide – an ebook from the largest Apple magazine
- Windows to Mac cheat sheet – simple chart for Windows users
- Noteboom Tutor apps – each includes about 50 short 5-minute video tutorials for $5.
- AppleCare warranty coverage and Apple support online
- Apple Genius Bar appointments at the Apple Store
- Learn more about your Mac in the help menu of any program
- Contact Creative Tech Support for personal, on-site assistance